Getting Started with MLServer
This guide will help you get started creating machine learning microservices with MLServer in less than 30 minutes. Our use case will be to create a service that helps us compare the similarity between two documents. Think about whenever you are comparing a book, news article, blog post, or tutorial to read next, wouldn’t it be great to have a way to compare with similar ones that you have already read and liked (without having to rely on a recommendation’s system)? That’s what we’ll focus on this guide, on creating a document similarity service. 📜 + 📃 = 😎👌🔥
The code is showcased as if it were cells inside a notebook but you can run each of the steps inside Python files with minimal effort.
00 What is MLServer?
MLServer is an open-source Python library for building production-ready asynchronous APIs for machine learning models.
01 Dependencies
The first step is to install mlserver, the spacy library, and the language model
spacy will need for our use case. We will also download the wikipedia-api library to
test our use case with a few fun summaries.
If you’ve never heard of spaCy before, it is an open-source Python library for advanced natural language processing that excels at large-scale information extraction and retrieval tasks, among many others. The model we’ll use is a pre-trained model on English text from the web. This model will help us get started with our use case faster than if we had to train a model from scratch for our use case.
Let’s first install these libraries.
pip install mlserver spacy wikipedia-api
We will also need to download the language model separately once we have spaCy inside our virtual environment.
python -m spacy download en_core_web_lg
If you’re going over this guide inside a notebook, don’t forget to add an exclamation mark !
in front of the two commands above. If you are in VSCode, you can keep them as they are and
change the cell type to bash.
02 Set Up
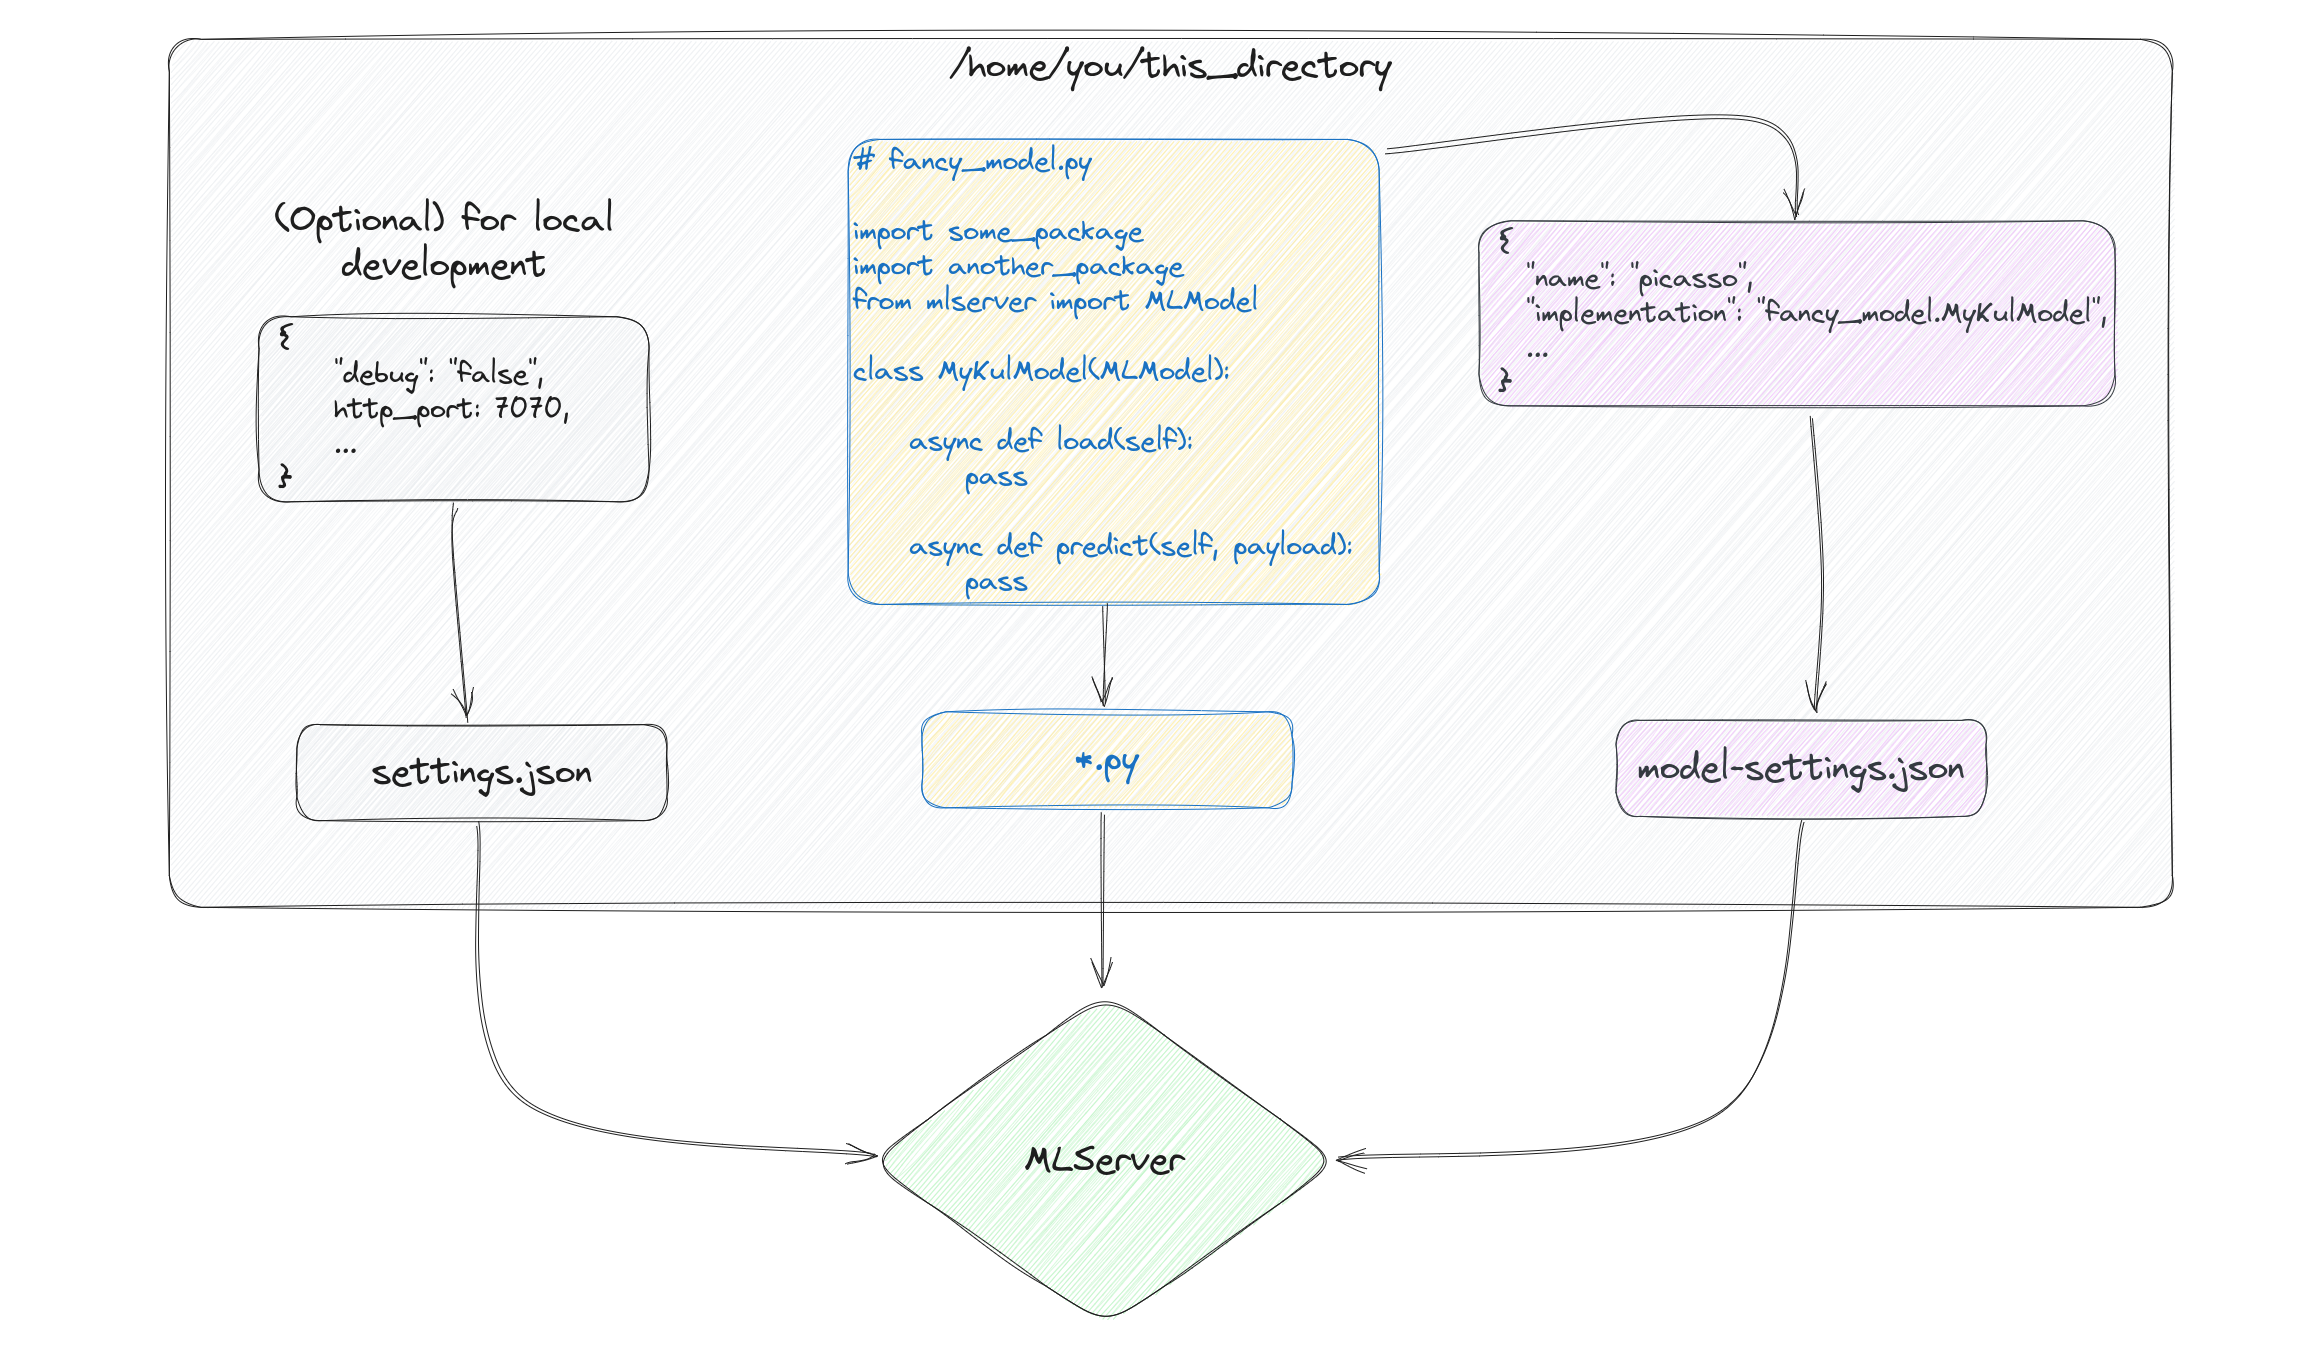
At its core, MLServer requires that users give it 3 things, a model-settings.json file with
information about the model, an (optional) settings.json file with information related to the server you
are about to set up, and a .py file with the load-predict recipe for your model (as shown in the
picture above).
Let’s create a directory for our model.
mkdir -p similarity_model
Before we create a service that allows us to compare the similarity between two documents, it is good practice to first test that our solution works first, especially if we’re using a pre-trained model and/or a pipeline.
import spacy
nlp = spacy.load("en_core_web_lg")
Now that we have our model loaded, let’s look at the similarity of the abstracts of
Barbieheimer using the wikipedia-api
Python library. The main requirement of the API is that we pass into the main class,
Wikipedia(), a project name, an email and the language we want information to be
returned in. After that, we can search the for the movie summaries we want by passing
the title of the movie to the .page() method and accessing the summary of it with
the .summary attribute.
Feel free to change the movies for other topics you might be interested in.
You can run the following lines inside a notebook or, conversely, add them to a app.py file.
import wikipediaapi
wiki_wiki = wikipediaapi.Wikipedia('MyMovieEval (example@example.com)', 'en')
barbie = wiki_wiki.page('Barbie_(film)').summary
oppenheimer = wiki_wiki.page('Oppenheimer_(film)').summary

print(barbie)
print()
print(oppenheimer)
If you created an app.py file with the code above, make sure you run python app.py from
the terminal.
Barbie is a 2023 American fantasy comedy film directed by Greta Gerwig and written by Gerwig and Noah Baumbach. Based on the Barbie fashion dolls by Mattel, it is the first live-action Barbie film after numerous computer-animated direct-to-video and streaming television films. The film stars Margot Robbie as Barbie and Ryan Gosling as Ken, and follows the two on a journey of self-discovery following an existential crisis. The film also features an ensemble cast that includes America Ferrera, Kate McKinnon, Issa Rae, Rhea Perlman, and Will Ferrell...

Oppenheimer is a 2023 biographical thriller film written and directed by Christopher Nolan. Based on the 2005 biography American Prometheus by Kai Bird and Martin J. Sherwin, the film chronicles the life of J. Robert Oppenheimer, a theoretical physicist who was pivotal in developing the first nuclear weapons as part of the Manhattan Project, and thereby ushering in the Atomic Age. Cillian Murphy stars as Oppenheimer, with Emily Blunt as Oppenheimer's wife Katherine "Kitty" Oppenheimer; Matt Damon as General Leslie Groves, director of the Manhattan Project; and Robert Downey Jr. as Lewis Strauss, a senior member of the United States Atomic Energy Commission. The ensemble supporting cast includes Florence Pugh, Josh Hartnett, Casey Affleck, Rami Malek, Gary Oldman and Kenneth Branagh...
Now that we have our two summaries, let’s compare them using spacy.
doc1 = nlp(barbie)
doc2 = nlp(oppenheimer)
doc1.similarity(doc2)
0.9866910567224084
Notice that both summaries have information about the other movie, about “films” in general, and about the dates each aired on (which is the same). The reality is that, the model hasn’t seen any of these movies so it might be generalizing to the context of each article, “movies,” rather than their content, “dolls as humans and the atomic bomb.”
You should, of course, play around with different pages and see if what you get back is coherent with what you would expect.
Time to create a machine learning API for our use-case. 😎
03 Building a Service
MLServer allows us to wrap machine learning models into APIs and build microservices with replicas of a single model, or different models all together.
To create a service with MLServer, we will define a class with two asynchronous functions, one that
loads the model and another one to run inference (or predict) with. The former will load the
spacy model we tested in the last section, and the latter will take in a list with the two
documents we want to compare. Lastly, our function will return a numpy array with a single
value, our similarity score. We’ll write the file to our similarity_model directory and call
it my_model.py.
# similarity_model/my_model.py

from mlserver.codecs import decode_args
from mlserver import MLModel
from typing import List
import numpy as np
import spacy

class MyKulModel(MLModel):

    async def load(self):
        self.model = spacy.load("en_core_web_lg")

    @decode_args
    async def predict(self, docs: List[str]) -> np.ndarray:

        doc1 = self.model(docs[0])
        doc2 = self.model(docs[1])

        return np.array(doc1.similarity(doc2))
Now that we have our model file ready to go, the last piece of the puzzle is to tell MLServer a bit of info
about it. In particular, it wants (or needs) to know the name of the model and how to implement
it. The former can be anything you want (and it will be part of the URL of your API), and the latter will
follow the recipe of name_of_py_file_with_your_model.class_with_your_model.
Let’s create the model-settings.json file MLServer is expecting inside our similarity_model directory
and add the name and the implementation of our model to it.
# similarity_model/model-settings.json

{
    "name": "doc-sim-model",
    "implementation": "my_model.MyKulModel"
}
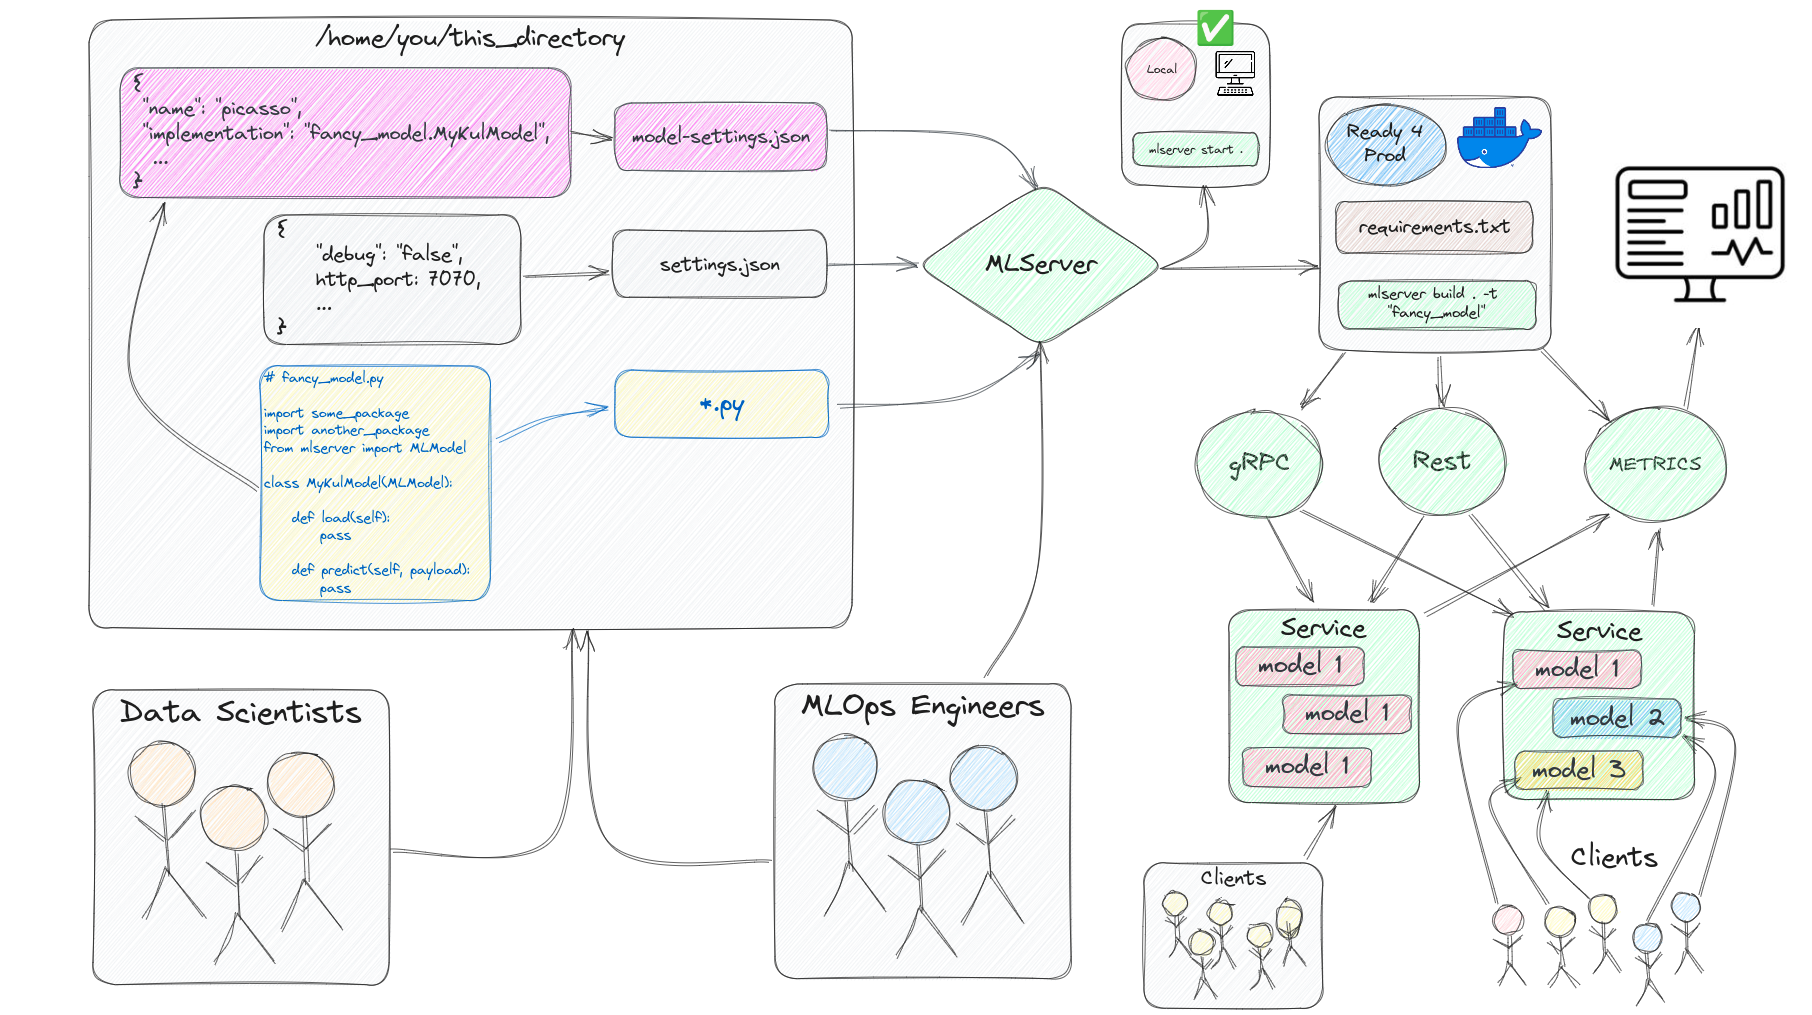
Now that everything is in place, we can start serving predictions locally to test how things would play out for our future users. We’ll initiate our server via the command line, and later on we’ll see how to do the same via Python files. Here’s where we are at right now in the process of developing microservices with MLServer.

As you can see in the image, our server will be initialized with three entry points, one for HTTP requests, another for gRPC, and another for the metrics. To learn more about the powerful metrics feature of MLServer, please visit the relevant docs page here. To learn more about gRPC, please see this tutorial here.
To start our service, open up a terminal and run the following command.
mlserver start similarity_model/
Note: If this is a fresh terminal, make sure you activate your environment before you run the command above.
If you run the command above from your notebook (e.g. !mlserver start similarity_model/),
you will have to send the request below from another notebook or terminal since the cell will continue to run
until you turn it off.
04 Testing our Service
Time to become a client of our service and test it. For this, we’ll set up the payload we’ll send
to our service and use the requests library to POST our request.
from mlserver.codecs import StringCodec
import requests
Please note that the request below uses the variables we created earlier with the summaries of Barbie and Oppenheimer. If you are sending this POST request from a fresh python file, make sure you move those lines of code above into your request file.
inference_request = {
    "inputs": [
        StringCodec.encode_input(name='docs', payload=[barbie, oppenheimer], use_bytes=False).dict()
    ]
}
print(inference_request)
{'inputs': [{'name': 'docs',
   'shape': [2, 1],
   'datatype': 'BYTES',
   'parameters': {'content_type': 'str'},
   'data': [
        'Barbie is a 2023 American fantasy comedy...',
        'Oppenheimer is a 2023 biographical thriller...'
        ]
    }]
}
r = requests.post('http://0.0.0.0:8080/v2/models/doc-sim-model/infer', json=inference_request)
r.json()
{'model_name': 'doc-sim-model',
    'id': 'a4665ddb-1868-4523-bd00-a25902d9b124',
    'parameters': {},
    'outputs': [{'name': 'output-0',
    'shape': [1],
    'datatype': 'FP64',
    'parameters': {'content_type': 'np'},
    'data': [0.9866910567224084]}]}
print(f"Our movies are {round(r.json()['outputs'][0]['data'][0] * 100, 4)}% similar!")
Our movies are 98.6691% similar
Let’s decompose what just happened.
The URL for our service might seem a bit odd if you’ve never heard of the
V2/Open Inference Protocol (OIP).
This protocol is a set of specifications that allows machine learning models to be shared and deployed in a
standardized way. This protocol enables the use of machine learning models on a variety of platforms and
devices without requiring changes to the model or its code. The OIP is useful because it allows us
to integrate machine learning into a wide range of applications in a standard way.
All URLs you create with MLServer will have the following structure.

This kind of protocol is a standard adopted by different companies like NVIDIA, Tensorflow Serving, KServe, and others, to keep everyone on the same page. If you think about driving cars globally, your country has to apply a standard for driving on a particular side of the road, and this ensures you and everyone else stays on the left (or the right depending on where you are at). Adopting this means that you won’t have to wonder where the next driver is going to come out of when you are driving and are about to take a turn, instead, you can focus on getting to where you’re going to without much worrying.
Let’s describe what each of the components of our inference_request does.
name: this maps one-to-one to the name of the parameter in yourpredict()function.shape: represents the shape of the elements in ourdata. In our case, it is a list with[2]strings.datatype: the different data types expected by the server, e.g., str, numpy array, pandas dataframe, bytes, etc.parameters: allows us to specify thecontent_typebeyond the data typesdata: the inputs to our predict function.
To learn more about the OIP and how MLServer content types work, please have a looks at their docs page here.
05 Creating Model Replicas
Say you need to meet the demand of a high number of users and one model might not be enough, or is not using
all of the resources of the virtual machine instance it was allocated to. What we can do in this case is
to create multiple replicas of our model to increase the throughput of the requests that come in. This
can be particularly useful at the peak times of our server. To do this, we need to tweak the settings of
our server via the settings.json file. In it, we’ll add the number of independent models we want to
have to the parameter "parallel_workers": 3.
Let’s stop our server, change the settings of it, start it again, and test it.
# similarity_model/settings.json

{
    "parallel_workers": 3
}
mlserver start similarity_model
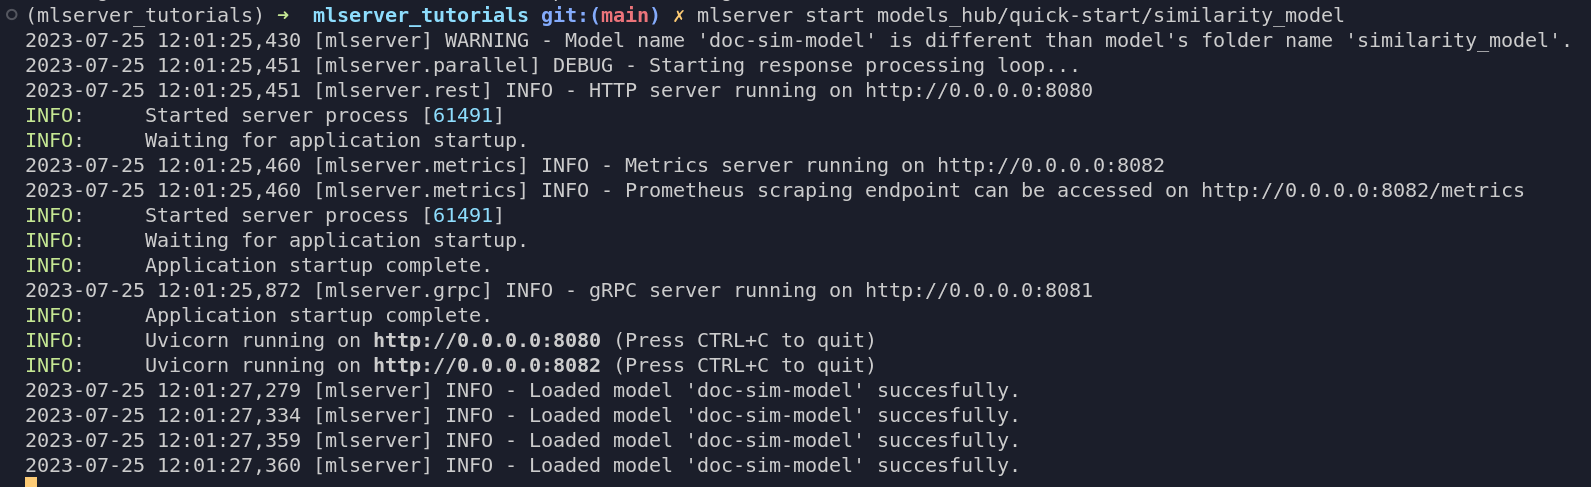
As you can see in the output of the terminal in the picture above, we now have 3 models running in parallel. The reason you might see 4 is because, by default, MLServer will print the name of the initialized model if it is one or more, and it will also print one for each of the replicas specified in the settings.
Let’s get a few more twin films examples to test our server. Get as creative as you’d like. 💡
deep_impact    = wiki_wiki.page('Deep_Impact_(film)').summary
armageddon     = wiki_wiki.page('Armageddon_(1998_film)').summary

antz           = wiki_wiki.page('Antz').summary
a_bugs_life    = wiki_wiki.page("A_Bug's_Life").summary

the_dark_night = wiki_wiki.page('The_Dark_Knight').summary
mamma_mia      = wiki_wiki.page('Mamma_Mia!_(film)').summary
def get_sim_score(movie1, movie2):
    response = requests.post(
        'http://0.0.0.0:8080/v2/models/doc-sim-model/infer',
        json={
            "inputs": [
                StringCodec.encode_input(name='docs', payload=[movie1, movie2], use_bytes=False).dict()
            ]
        })
    return response.json()['outputs'][0]['data'][0]
Let’s first test that the function works as intended.
get_sim_score(deep_impact, armageddon)
0.9569279450151813
Now let’s map three POST requests at the same time.
results = list(
    map(get_sim_score, (deep_impact, antz, the_dark_night), (armageddon, a_bugs_life, mamma_mia))
)
results
[0.9569279450151813, 0.9725374771538605, 0.9626173937217876]
We can also test it one by one.
for movie1, movie2 in zip((deep_impact, antz, the_dark_night), (armageddon, a_bugs_life, mamma_mia)):
    print(get_sim_score(movie1, movie2))
0.9569279450151813
0.9725374771538605
0.9626173937217876
06 Packaging our Service
For the last step of this guide, we are going to package our model and service into a docker image that we can reuse in another project or share with colleagues immediately. This step requires that we have docker installed and configured in our PCs, so if you need to set up docker, you can do so by following the instructions in the documentation here.
The first step is to create a requirements.txt file with all of our dependencies and add it to
the directory we’ve been using for our service (similarity_model).
# similarity_model/requirements.txt

mlserver
spacy==3.6.0
https://github.com/explosion/spacy-models/releases/download/en_core_web_lg-3.6.0/en_core_web_lg-3.6.0-py3-none-any.whl
The next step is to build a docker image with our model, its dependencies and our server. If you’ve never heard of docker images before, here’s a short description.
A Docker image is a lightweight, standalone, and executable package that includes everything needed to run a piece of software, including code, libraries, dependencies, and settings. It’s like a carry-on bag for your application, containing everything it needs to travel safely and run smoothly in different environments. Just as a carry-on bag allows you to bring your essentials with you on a trip, a Docker image enables you to transport your application and its requirements across various computing environments, ensuring consistent and reliable deployment.
MLServer has a convenient function that lets us create docker images with our services. Let’s use it.
mlserver build similarity_model/ -t 'fancy_ml_service'
We can check that our image was successfully build not only by looking at the logs of the previous
command but also with the docker images command.
docker images
Let’s test that our image works as intended with the following command. Make sure you have closed your
previous server by using CTRL + C in your terminal.
docker run -it --rm -p 8080:8080 fancy_ml_service
Now that you have a packaged and fully-functioning microservice with our model, we could deploy our container to a production serving platform like Seldon Core, or via different offerings available through the many cloud providers out there (e.g. AWS Lambda, Google Cloud Run, etc.). You could also run this image on KServe, a Kubernetes native tool for model serving, or anywhere else where you can bring your docker image with you.
To learn more about MLServer and the different ways in which you can use it, head over to the examples section or the user guide. To learn about some of the deployment options available, head over to the docs here.
To keep up to date with what we are up to at Seldon, make sure you join our Slack community.